Create an evil twin to phish wifi keys
André Eichhofer
In the last post we saw how to span a rogue access point with a Linux machine to intercept wifi traffic. This time we will extend our attack and establish an evil twin to phish passwords, wpa keys and other credentials. An evil twin is a rogue access point that poses as a legitimate access point and may use the same ssid as the target network.
For the phishing attack we need to,
- spawn a rogue access point and
- create a fake captive portal
- collect the victims data
For the evil twin we will use a Linux VM. After that, we can setup a fake captive portal manually or use some tools.
Create an evil twin manually
To setup the rogue access point just follow the instructions here. When you configure hostapd.conf, specify the ssid of your rogue network, like this
...
ssid=<evil_twin_network_name>
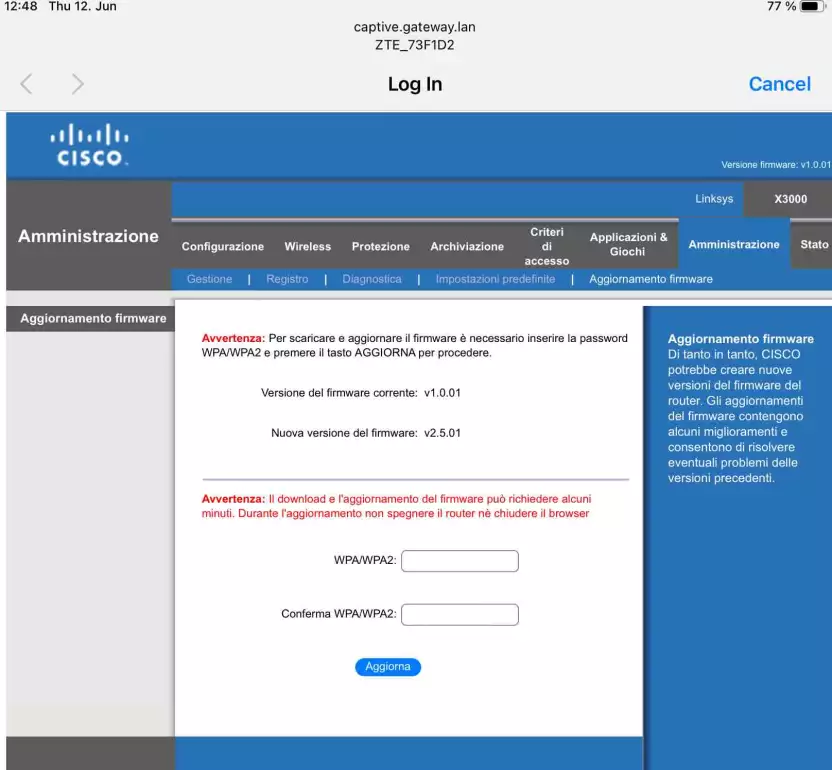
...The next step is to create a fake captive portal that we will use to phish user credentials. A captive portal is a web page (splash page) that pops up if a client connects to a wifi network. The captive portal is usually hosted on the access point and may run at port 80 or 443. The purpose of the captive portal is to allow only authenticated users to use the access point. Therefore, the captive portal usually blocks all traffic except of port 80, 443 and 53.
The captive portal is triggered by the client and opens up a built-in browser. This process is called Captive Portal Detection (CPD). During the CPD the client connects to a detection server at port 80. This request is routed by the client device to the Gateway of the access point. As soon as the client receives this initial port 80 request on the default gateway, the captive portal server “captures” it and notifies the client device. Then the client device redirects the user to the captive portal.
To create a fake captive portal we will Nodogsplash.
To install Nodogsplash,
apt-get update+apt install libmicrohttpd-dev build-essential: Install microhttpd library that Nodogsplash depends ongit clone https://github.com/nodogsplash/nodogsplash.gitcd nodogsplash+make+make install
Nodogsplash uses the following files and directories on your machine:
/usr/share/nodogsplash: Nodogsplash server/etc/nodogsplash/nodogsplash.conf: Nodogsplash configuration file/etc/nodogsplash/htdocs: Nodogsplash html files
Open nodogsplash.conf and add your configuration settings
GatewayInterface wlan0          # Gateway interface
GatewayAddress <gateway_ip>     # Gateway address, eg. 192.168.1.1
MaxClients 250
AuthIdleTimeout 480
SplashPage splash.html          # Set this to your own files
Start Nodogsplash with nodogsplash
Terminate Nodogsplash with
netstat -tulpen+kill <pid>
When I tested Nodogpslash it worked quiet well, though a little bit slow. If the clients do not get internet access and the portal does not pop up, this signals that Nodogsplash is actually working, but blocks the traffic. On the client device trigger “forget that network” and try again.
Perform evil twin attack with Wifiphisher
Wifiphisher is a versatile tool that performs different kinds of Wifi attacks, including Karma and Known-Beacon-Attacks. The tool comes with a lot of phishing templates, that you can adjust for your own needs.
To install and start Wifiphisher,
apt-get install wifiphisherwifiphisher: start wifiphisher in interactive interfacewifiphisher <options>: start wifiphisher without interface
Before you start, you need to set your wifi adapter in monitor mode,
airmon-ng check killairmon-ng start <wlan0>
I will not explain Wifiphisher in detail, just check out their docs.
Once you’re ready to start, you need to decide what kind of evil twin attack you want to perform with Wifiphisher. The tool offers a set of scenarios,
Karma attack
A Karma attack is by default “included” when you trigger Wifiphisher. That means Wifiphisher will spawn a list of known SSID’s to trick the victim client to connect to,
wifiphisher -i wlan0mon -p oauth-login
For this attack, we do not need to specify our own SSID, because the evil twin transmits a list of well-known SSIDs and we hope that the victim will connect to one of them.
Known Beacon attack
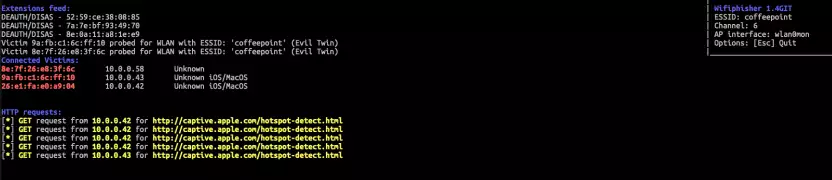
This attack tries to connect the victim automatically with the evil twin by using the same SSID that the client my have in their preferred network list (pnl). Wifiphisher combines this attack with the Karma attack. At the same time it deauthenticates users from the existing access point.
wifiphisher -i wlan0mon -e "freewifi" -kB -p oauth-login
Targeted attack
Depending on your scenario, Wifiphisher can target a specific access point and create an evil twin with a targeted SSID.
wifiphisher -i wlan0mon -e "conference room" -p oauth-login -dK
Here, we disable the Karma attack, because it would make no sense for this scenario.
You can even spawn an encrypted network to make the attack more authentic,
wifiphisher -i wlan0mon -e "conference-room" -pK <shared_wifi_key> -p oauth-login
Performance
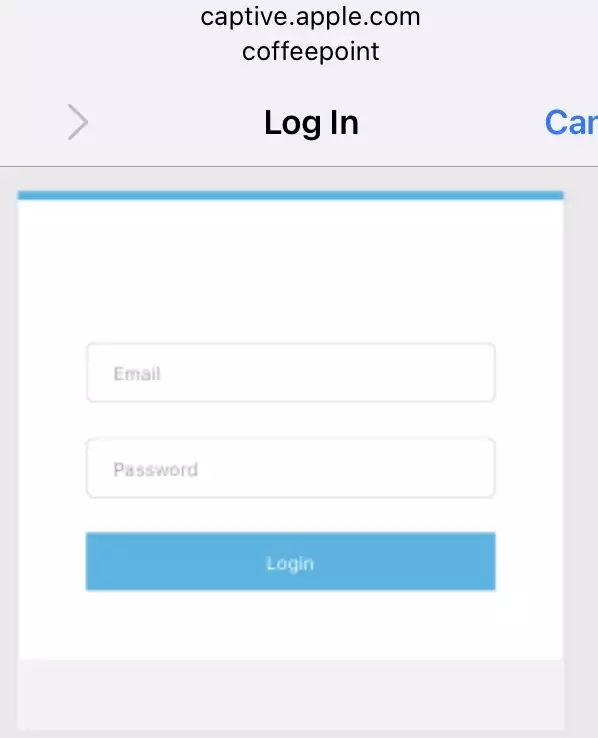
Though, Wifiphisher offeres a lot of scenarios I had some performance issues when testing the tool. First, the captive portal loaded very slow. Second, when the captive portal appeared on my Iphone SE, I could not enter any credentials.
Phish wifi keys with Fluxion
Fluxion is a sophisticated tool for creating evil twins with fake captive portals. It offers a lot of realistic phishing templates that you can modify or replace with your owns. Fluxion is made expecially to phish wpa / wpa2 keys.
To install Fluxion,
git clone https://www.github.com/FluxionNetwork/fluxion.gitcd fluxion & ./fluxion.sh
Once installed, Fluxion uses the following directories to store templates and loots,
/fluxion/attacks/captive-portal/pwdlog: phished passwords/fluxion/attacks/captive-portal/sites: phishing templates/fluxion/attacks/handshake-snooper/handshakes: handshake frames
To phish wifi keys Fluxion first needs to capture a handshake frame from the target network. In a second step, Fluxion creates an evil twin with a fake captive portal that prompts the victim to enter the wpa key for the network. Fluxion then compares the hashes of the keys to ensure the victim provided the correct key. You can, of course, achieve the same goal if you would try to bruteforce the key. However, given the fact that modern AP’s may use bit lengths of 64 or more and complex passphrases, it may be more useful to phish the credentials.
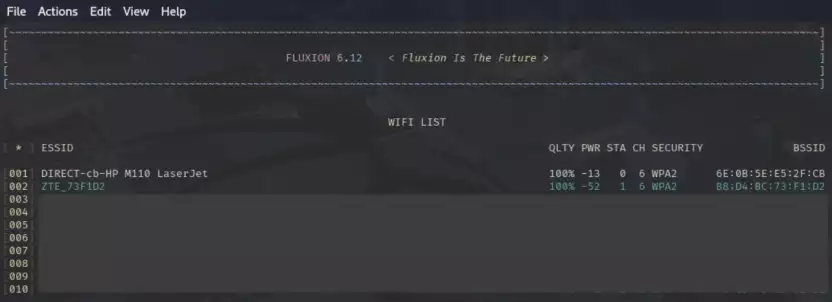
When started, Fluxion uses a gui interface where you can choose your attack. At first you want to capture the handshake frames with the Handshake Snooper. Fluxion let’s you choose your target network and asks you whether to capture the handshake passively or agressively using de-authentication attacks. You can also provide an already existing capture file to Fluxion. Note, that it may take some time to capture a handshake.
Once you got the handshake it’s time to create the evil twin. Fluxion will create a rogue access point using the same SSID as your target network. At the same time Fluxion de-authenticates clients from the target network and new clients are tricked to connect to the evil twin. To start the attack, choose Captive Portal and then confirm the handshake frame that shall be used. In addition, you can provide an SSL certificate. Note, that a certificate will trigger a warning at the victims client, because the client does not trust the certificate. At the end you can choose from a list of phishing templates, that will prompt the victim to enter their wifi key. Of course, you can use your own templates, too. When tested, the captive portal loaded fast and the performance was well, what makes Fluxion an ideal tool to phish wifi keys.