The Hard Way of Emulating Firmware Part 3
It’s not your fault when it’s not working.
André Eichhofer
Happy day,
in the last part we learned how to emulate firmware with Qemu and FAT using Attify OS. The success rate for FAT was slightly low, at least for me. Therefore, let’s try out other tools, namely Firmedyne and FirmAE.
Emulating firmware with Firmedyne
Firmadyne is based on Qemu and already installed on Attify OS. Firmadyne attempts to configure the emulation environment automatically and then starts the firmware, establishs a network connection and opens a console on the emulated the device. Firmadyne uses a postgesql database to store information about the firmware, so that you don’t need to configure the emulation each time again and again.
Firmadyne is pre-installed in Attify-OS and there are following files and folders in the installation directory:
/analyses: Scripts to analyze the firmware once it is running/database/schema: Schema for the postgresql database firmadyne.config: Firmadyne config file/images: Extracted firmware filesystems as .tar that are used for emulation/scratch: Directories for each firmware that contains images from the firmware filesystems/scripts: Scripts that needs to be executed in order to configure Firmadyne and emulate the firmware
Before you start emulation, you need to configure the postgresql database with the schema that is used to store firmware data.
- Install and start postgesql
sudo -u postgres createuser -P firmadyne: Create user firmadyne; ensure that the password is the same like in thefirmadyne.configfile (firmadyne)sudo -u postgres createdb -O firmadyne firmware: Create database firmware and assign it to owner firmadynesudo -u postgres psql -d firmware < ./firmadyne/database/schemа: Assign database schema to database firmware- Login to postgresql and check that the database was created
 sudo -u postgres psql
 # \l
In the next step, you need to setup the work directory within Firmadyne configuration file: Edit firmadyne.config and check your work directory, e.g FIRMWARE_DIR=/home/root/Desktop/firmadyne
Next, ensure that firmadyne can use https://github.com/ReFirmLabs/binwalk text Binwalk in order to extract firmware images:
git clone https://github.com/ReFirmLabs/binwalk.git`
cd binwalk
sudo python setup.py install
Use the setup script to initialize and configure Binwalk. Next, you need two install more Python packages:
sudo -H pip install git+https://github.com/ahupp/python-magic
sudo -H pip install git+https://github.com/sviehb/Jefferson
After the configuration is done, it’s time to prepare the firmware. As a first example, I use our Totolink-X200 firmware.
-
Check that postgresql database is running:
service postgresql status/sudo netstat -tulpen -
Put the firmware image in the
/firmadynework directory -
Extract firmware image with the
extractor.pyscript:./sources/extractor/extractor.py -b Totolink -sql 127.0.0.1 -np -nk "totolink-x200.web". If extraction was successful, atarfile with the image number is created in the/imagesfolder. -
Detect firmware architecture and save it to the database:
./scripts/getArch.sh images/1.tar.gz ./bin/busybox: mipseb -
Store information from image in the database
./scripts/tar2db.py -i 1 -f images/1.tar.gz -
Make Qemu image:
./scripts/makeImage.sh 1 mipseb: specify image number and archicture determined bygetarch.sh. If successful, a subdirectory with the firmware indicator is created in the/scratchfolder. If successful, a scriptrun.shis generated under/scratch/<image_no> -
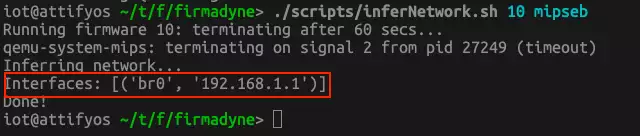
Configure network: Firmadyne attempts to configure a bridge to establish a network connection and assigns an IP address to the firmware interface.
./scripts/inferNetwork.sh 1 mipseb.
In this step, it is very important that an IP address is assigned. If not, it indicates that the firmware will not run properly. As we see, for the Totolink EX200 no IP address is assigned.

- Run firmware: Navigate to the
/scratchdirectory and use therun.shscript to start the firmware:./scratch/1/run.sh
As expected, the Totolink-EX200 firmware does not run as expected. As there is no IP address assigned to the machine, we cannot test the web server. There may be several reasons, that I will not investigate here.
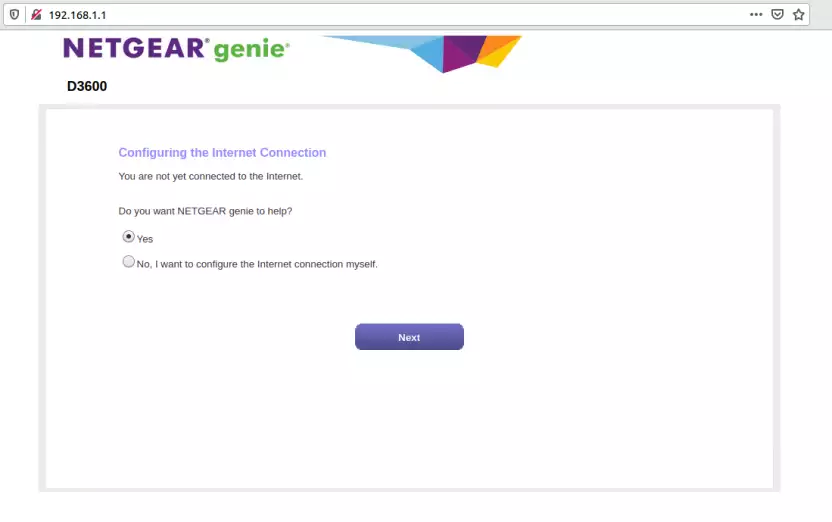
Rather I test another firmware, namely Netgear D3600. When we infear the network this time we see that the IP address 192.168.1.1 is assigned to the machine.
After starting ./run.sh from the scratch folder, the firmware seems to run. We can even open up a browser and navigate to the assigened IP.
This way, I tested several firmwares with Firmadyne and as a verdict I can say that around thirty percent did run. You can check the /analyze/readme.md file for firmwares that have been tested successfully with Firmadyne.
Hold on, there is more.
Scrape firmware with Scraper
Firmadyne comes with a neat little script, called “Scraper” to scrape firmwares in the internet. Scraper is based on Scrapy, a Python library to scrape the content of websites. The Scraper project extracts links to firmware images from common vendors.
To use Scraper, you first need to install Scrapy,
pipx install scrapy
To install Scraper
git clone https://github.com/firmadyne/scraper.gitto your work directory.
Follow the Scrapy tutorial to get familiar how to use Scrapy projects.
To run a specific scraper, e.g. dlink:
scrapy crawl dlink
Emulate firmware with FirmAE
As for now, my attempts to emulate different firmware were rather not successfull. I am probably not the only one. That’s why some guys from South Korea developed an open source emulator with the goal to raise the success rate. FirmAE is a firmware emulator that is based on Firmadyne and Qemu. FirmAE attempts to configure the emulation environment automatically, tests, starts the firmware and establishs a network connection. FirmAE uses heuristics to emulate firmware and claims to have higher success rate. Read their paper, here..
After you have installed FirmAE you will find the following folders within the installation directory:
/analyses: Scripts to analyze firmware/firmwares: Directory where firmware is usually stored/images: Location of OS images for emulation/scratch:subdirectory with an image ID, stores all intermediate outputs and results for that specific run/scripts: Various sub-scripts called by the main scripts/sources/scraper/firmware/spiders/: Contains files corresponding to thebrandargumentrun.sh: Main execution scriptfirmae.config: Firmae configuration file
To configure FirmAE check the firmae.conf file and change FIRMAE_DIR=/path/to/FirmAE if necessary.
To run the firmware, invoke the start script with
./run.sh <mode> <brand> </path/to/firmware>
with one of the following options:
-c: Checks the firmware and network connection-r: Runs the firmware-d: Runs the firmware in debug mode-a: Analyzes the firmware
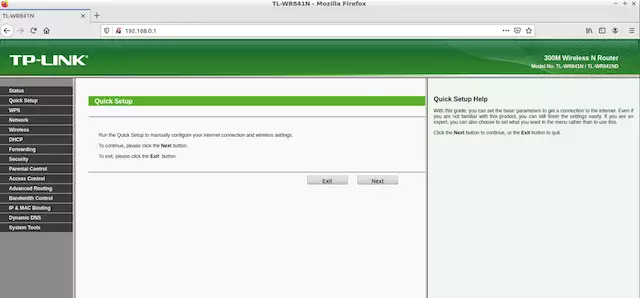
I decided to test FirmAE with the TP-Link TL-WR841N, because I couldn’t get this firmware to work with FAT and Firmadyne.
sudo ./run.sh -d tplink /Documents/firmwares/tl-wr841N.zip
Note: When you run a firmware with FirmAE the first time it may take half an hour or more to start the firmware. That’s normal, because FirmAE conducts certain tests in the background. Just be patient.
In my case, the firmware starts successfully. However, when we look at the network interface we see that the IP address 192.168.0.1 was assigned.
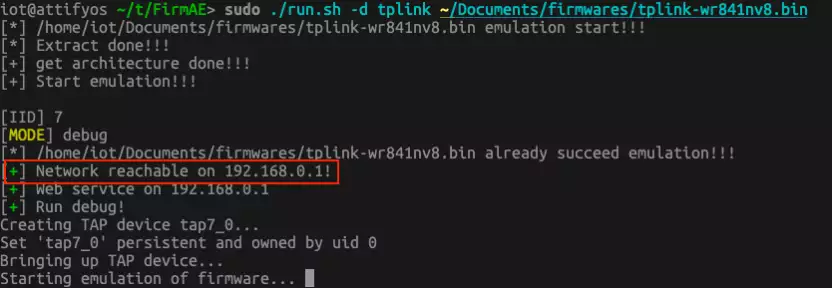
Coincendently, this is also the IP address of my own access point. Means, requesting the IP is useless.
This brings us to the issue how the firmware actually assigns IP addresses. According to FirmAE, when the emulator doesn’t find an IP address within the firmware, it falls back the access points IP. FirmAE proposes different ways to fix this.
You can try to change the assigned IP address by
- editing
/scratch/<no>/run.shand change the IP address in the script and - mount
/scratch/<no>/image.rawand change IP addresses in the filefirmadine/network.sh
For me, changing the IP addresses in the scripts didn’t work. However, when we use a virtual machine for testing, we can simply isolate our network, so that our VM shares a private network with the host.
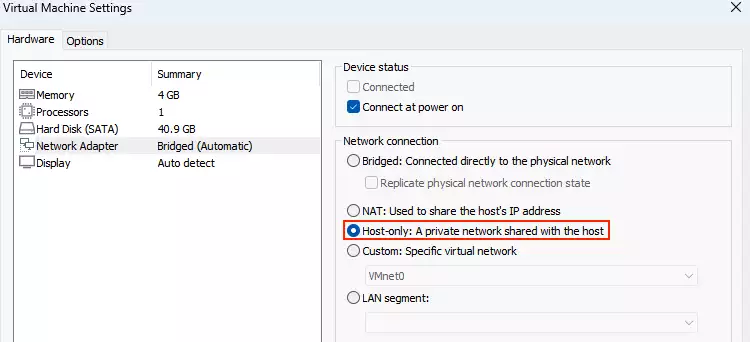
When we start emulation again we can open a browser and navigate to the assigned IP. We are ready now to test the web server and hunt for vulnerabilities.
Btw, the developers published a list of successful tests with different vendors, here
As a conclusion, FirmAE has a high success rate and it’s a good tool to test firmware if you’re not able to get the physical device.